Next year I'll get in early and add some "how to's" of some of the makes I did this year. I'm especially excited about sharing the gingerbread house recipe with you as my little boy had so much fun decorating it.
Friday, 31 December 2010
CHRISTMAS
Next year I'll get in early and add some "how to's" of some of the makes I did this year. I'm especially excited about sharing the gingerbread house recipe with you as my little boy had so much fun decorating it.
Tuesday, 7 December 2010
FELT HEARTS
Monday, 6 December 2010
THE FINISHED GINGERBREAD GARLAND
Here's the finished article. Excuse the poor picture, hanging it above the mirror to take a photo wasn't the best thing to do!!
The garland was an artificial plant from TK Max, I didn't think it would work at first but after trimming off a few branches and tidying up each end, it has come together nicely.
Thursday, 2 December 2010
CHRISTMAS PUDDING
I used the recipe from the Nigella's Christmas book as we'd tried it out last year. Her recipe recommends using a certain type of sherry to soak the fruit in, I opted for brandy instead.
The next day all the ingredients were combined into the bowl, giving them a good stir.
Unfortunately the other members of the house were out so they didn't get a wish as they stirred this year!
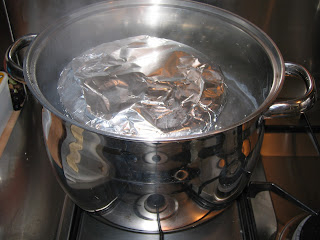
Then the mixture goes into pudding basins and wrapped in foil (just incase of a lid poping incident!) and put in a pan of boiling water for 5 hours!!!
Monday, 29 November 2010
RIBBON WREATH
Monday, 8 November 2010
CHRISTMAS CAKE
The trick with fruit cakes being cooked over a long period of time is to wrap it well before putting in the oven. I used a double thickness of baking parchment in the tin before pouring (or dolloping more like) the cake mixture in. Then I wrapped the tin with a double thickness of brown paper, securing it with string. The paper needs to be at least double the height of the cake tin to protect it from getting scorched.
I forgot to take photos but the recipe I used is the one from Nigella's How to Be a Domestic Goddess. It hasn't failed me yet although with one of the cakes I did go a bit over the top with almond essence. Never mind, I'm saving that one for us as hubby likes marzipan so I'm sure he won't notice!!
Time to restock the fruit cupboard before stir up Sunday!
Thursday, 4 November 2010
SLOE GIN
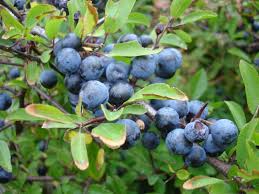
A reliable source (my dad!!) told me it was a good year for Sloes, so we had a productive picking session around some country lanes not too far away on Friday.
I must admit I'd never have noticed the berries growing on the blackthorn bushes by the side of the road if they hadn't been pointed out. They seem very well disguised! But once you're up close they are very distinctive.
There's only one thing to do with these berries and that's to add them to gin. It's been a long time since I tasted this and I can't quite remember what it was like so I'll have a couple of months to wait before I can remind myself!
SLOE GIN
450g sloes
350g sugar
750ml gin
If the sloes haven't been out in a frost I have read a good recommendation to pop them in the freezer overnight to start releasing the juices. I didn't have to do this for mine but it's a useful tip and saves time pricking each berry with a fork.
Once you've done this you can start adding the sloes to the jars, a layer of sloes to a layer of sugar (I have seen recipes for both brown and caster sugar). Once the conatiner is full you can top it up with gin (this doesn't have to be any special brand of gin).
You'll need to turn the jar once a week and it'll need to be left for about 2 -3 months in a cool dark place.
DIWALI SWEETS
They went down a treat last year and as they are called sweets it means I can get the little man to eat dates without a second thought!!
Tuesday, 2 November 2010
Thursday, 28 October 2010
WINTER FELT WREATH
So far I've cut out most of the flowers, just a few more centres to do and then I can get assembling.
I've got no idea where I can hang it yet!
for some reason I can't link to the site at the moment so I've posted the address below if you want to take a look.
http://www.purlbee.com/the-purl-bee/2010/1/14/pages-felt-flower-winter-wreath.html
Here's the wreath before it's assembled:
ONION, HERB AND BACON SCONES
This one came from the November edition of the Sainsbury's magazine. There is a page dedicated to different versions of the delightful scone (although not one for the purists!) and this is the first one I had a go at.
I had one with some leek and potato soup for lunch and I'm hooked, I can see these taking the place of ham and cheese muffins in my freezer this winter.
275g natural yoghurt
25ml double cream
25g caster sugar
400g plain flour
2tsp creme of tartar
1tsp bicarbonate of soda
50g cold butter, diced
100g cold shredded fried bacon
4 spring onions, sliced finely
handful of chopped parsley
a handful of grate cheese
beaten egg (or yoghurt) to brush the top with
Preheat the oven to 220 degrees C, or 200 for a fan assisted oven.
Stir together the yoghurt, cream and sugar and leave for a few minutes so the sugar can dissolve.
Sift the flour, bicarbonate of soda, creme of tartar and 1/2 tsp salt into a large mixing bowl and lightly rub in the butter.
Add the cooked bacon, parsley and spring onions to the flour and mix.
Add the toghurt mixture to the flour and stir using a blunt knife until it's all mixed together. Work it together until if forms a sticky douhg (it's easier to use hands at this stage).
Scoop out the dough onto a floured surface and pat it out to a thickness of about 2.5cm.
Cut out the scones with a 6cm cutter (remembering not to twist it as this stops the scone rising so well) and place on a tray covered in baking parchement.
Brush the tops with beated egg and add a bit of grated cheese to the top.
Cook for 12-14mins until it's turning golden ontop.
Wednesday, 27 October 2010
CRANBERRY AND WHITE CHOCOLATE COOKIES
I have made a couple of changes to her cookie recipe as I had no pecan nuts and didn't want to use the dark brown sugar so I opted for just caster sugar for a lighter biscuit.
150g plain flour
1/2tsp baking powder
1/2 tsp salt
75g rolled oats
125g soft butter
175g caster sugar
1 egg
1tsp vanilla extract
100g dried cranberries
175g white chocolate chips
Tuesday, 26 October 2010
GINGERBREAD MEN GARLAND
The gingerbread men are the same style as her Tilda characters with rosy cheeks and pin prick eyes.
PLUM JAM
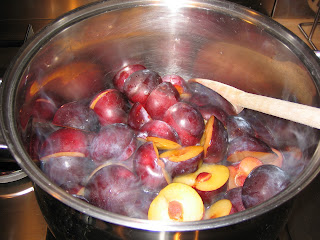
Bring to the boil and remove the stones as they rise to the top. Boil rapidly until you have reached setting point.
I find the easiest way is to put a plate in the fridge/freezer and once it has been boiling for 10mins or so take the plate out, put a small blob onto the plate and if it has reached setting point then the jam will wrinkle when you push it.
You can also test by lifting some liquid on the spoon and tip it off so the liquid runs down the back of the spoon. If it has reached the right temperature the liquid doesn't drip off in several drips but rather coagulates into one clot as it runs off.
This batch of jam seemed to take forever to reach setting point, more like 20mins.
Monday, 25 October 2010
ELF CLOGS
A few weeks ago I got this idea from the MSE forum. Elf clogs - how cute!! Straight away I found out my stash of felt and made up a pair in green with red embroidery silk for the blanket stitch around the edges.
I raided the button tin to find some tiny red buttons to sew onto the front, but they were still missing something.
After a quick search on ebay I found the perfect little bells in silver and gold which I'm going to sew on the end of the shoe.
I want to make a few pairs in a variety of Christmassy colours so I've been busy on some white and green ones (which I love!).
I can't believe I'm already making Christmas decorations but I suppose it'll be here before we know it.
Here's the link to the elf shoe pattern if you fancy having a go http://allsorts.typepad.com/allsorts/2007/11/ears-to-your-el.html
Tuesday, 19 October 2010
PUMPKIN TIME
These are the pumpkins I've done in previous years:
I started off very basic with the first pumpkin I did a couple of years ago. Last years spider web was the trickiest but I loved it. I'd like to do a haunted house this year but other than that I'm stumped!
Monday, 18 October 2010
HOW TO MAKE CHOCOLATE TRUFFLES
50g unsalted butter
100ml cream
200g milk chocolate broken into pieces.
140g dark (or milk) chocolate
cocoa powder
100g white chocolate, melted
2tbsp alcohol of your choice (optional)
Put the butter and the cream in a pan and put over the heat until the butter has melted and the mixture is bubbling. Remove the pan from the heat and add the milk choclate pieces.Stir until the chocolate has melted.
(If you want to make liquors then now is the time to add 2tbsp of alcohol, something like Grand Marnier would be lovely!!).
Put the bowl into the fridge and leave until it has set and is firm (takes about 3hours).
Once it has firmed up you can get a spoon full of the mixture and roll it into a ball using the palms of your hands. This can get quite messy so it's useful to have a cloth to hand!
Next you need to roll each of the balls in some cocoa powder to give it a light dusting.
Put the truffles back into the fridge to firm up again (if you need to do these quickly you can put them into the freezer for a short time).
Melt the dark chocolate over a pan of simmering water.
You can now dip the truffles into the melted chocolate using a cocktail stick. Let the excess chocolate drip off and then leave to set on a plate or tray covered with baking parchment.
Allow the truffles to set again in the fridge and then using some melted white chocolate and a disposable piping bag, pipe over 3 or 4 lines on each truffle.
If you don't have a piping bag you can drizzle some melted white chocolate over using a spoon.
LET THE COUNTDOWN COMMENCE!
I have a few Halloween bits and pieces to be getting on with but other than that most of my up and coming makes will be all things festive.
Stocking for the Little Man
Gingerbread Men garland
Elf shoes/clogs
Christmas Wreath
Things I'd like to do:
Teacup candles
Penguin family from Sew Pretty Christmas Homestyle - so cute!!
Reindeer hobby horse
That should get me started but I'm sure I'll be adding to the list as I find some more gorgeous things in my Christmas sewing books.
Saturday, 16 October 2010
ANOTHER BIRTHDAY CAKE!
It wasn't too complex but took a little time to make the truffles to go ontop of the cake as they had to set at each stage.
The cake is just a chocolate sponge (from Rachel Allen's bake) sandwiched with chocolate buttercream and coated in the same cream to allow the fingers to be stuck around the edge. The top was decorated with the handmade truffles and a ribbon around the edge kept all the fingers in place and finished off the cake nicely. I wouldn't recommend a lot of this cake at once, it's very rich, saying that though my husband managed to polish off a large piece with no trouble but then he's more of a chocaholic than me!
I'll post the recipe for the truffles later on.
Monday, 11 October 2010
FIRE ENGINE CAKE
Well it's been a while since my last post and the reason for this is I've been so busy with the Little Man's birthday cake. He'd requested a fire engine cake and having never made a cake using sugarpaste before I had a lot of research to do. I learnt a lot along the way and it was well worth it in the end.
I chose to use a maderia cake as it's quite a dense sponge which can support the stacking of the loaves and the decoration ontop. It also tastes better after a day or two which meant I could get ahead by baking the loaves on the Thursday.
After the loaves had cooled I levelled them off and cut one loaf and stacked these pieces end on to make the cab of the engine.
Later that night the next stage was to crumb coat the cake, which sounded very complicated but just meant covering it in buttercream. I used a red paste to colour the cream rather than a liquid food colouring and a small amount of this gave the right shade of red. I have to say that I would have been lost without my new pallet knife at this point!
The day after I rolled out the icing (I cheated a little here and had bought pre coloured red icing) and after the third attempt managed to cover the cake and smooth down the sides.
Then came the best bit!! I was really good fun to add all the little bits of detail on the cake and I mixed up lots of different colours using food colouring and white icing to make the lights, hose, water etc.
The real test came on the Saturday and I'm pleased to say that my son loved his cake, he wouldn't let us cut it until the next day as he wanted to look at it. But after he found ot you could eat the oreo cookie wheels the cake was devoured!